So the big 1.0 is finally here. I've added some fixes to collision detection as I was making demos. One of the fixes that I should have really done before was the bounding sphere. Instead of recalculating it every single time, I have it stored in the model and only recalculate it if its size change, otherwise, the center will always be the object's position and and radius stays the same.
As for the demos, I've created 3 so far, and I plan to make at least one more. Here are the links to them:
Demo 1 - Pong
Demo 2 - Linear Collision
Demo 3 - Multi-direction Collision (with no triangle test)
And here's the 4th demo
Demo 4 - Multi-direction Collision (with triangle test)
Friday, April 24, 2009

Thursday, April 23, 2009
Another Demo
So I've made 2 small demo. This one uses collision detection to find all objects that have a collision, and make those objects bounce off of each other.
Blog on C3DL: http://www.c3dl.org/index.php/demos/simple-collision-detection-demo/
Blog on C3DL: http://www.c3dl.org/index.php/demos/simple-collision-detection-demo/
Old and New Post
Forgot to link the blog about 0.9 release.
http://www.c3dl.org/index.php/c3dl-dev/collision-detection-09-release/
And here, I've made a simple game of pong in C3DL. Play Here.
On to updates.
As I was making a demo using collision detection, I've found some bugs that I didn't encounter before. I was a little surprise at first, since I thought I've tested it pretty thoroughly and tried many different things with it. I guess I was wrong. For example, I clearly thought I had consider the scaling factor in the model when I get their bounding sphere, but that was missed out. So now I've got that fixed.
However, onto an even more serious problem. I ran into a situation where my collision detection is failing when two objects are obviously colliding. Again, this happens when both objects have been scaled. As I review my code, I found that I had include in the scaling factor as I was testing for both bounding sphere and triangle-triangle intersection test. Hence, I'm a little stuck right now. And with so little time left till the big 1.0 release, I'm definitely starting to panic.
http://www.c3dl.org/index.php/c3dl-dev/collision-detection-09-release/
And here, I've made a simple game of pong in C3DL. Play Here.
On to updates.
As I was making a demo using collision detection, I've found some bugs that I didn't encounter before. I was a little surprise at first, since I thought I've tested it pretty thoroughly and tried many different things with it. I guess I was wrong. For example, I clearly thought I had consider the scaling factor in the model when I get their bounding sphere, but that was missed out. So now I've got that fixed.
However, onto an even more serious problem. I ran into a situation where my collision detection is failing when two objects are obviously colliding. Again, this happens when both objects have been scaled. As I review my code, I found that I had include in the scaling factor as I was testing for both bounding sphere and triangle-triangle intersection test. Hence, I'm a little stuck right now. And with so little time left till the big 1.0 release, I'm definitely starting to panic.
Sunday, April 5, 2009
Collision Detection - Sectioning DONE
Sectioning is implemented and done. This should reduce the time it takes to run collision detection when there are large amounts of objects in the scene. For more details, read the blog at http://www.c3dl.org/index.php/c3dl-dev/collision-detection-sectioning/.
Wednesday, April 1, 2009
Release 0.8
The day has come for another release. And what's a release without a blog? Here's the post for it http://www.c3dl.org/index.php/c3dl-dev/collision-detection-recap-of-release-08/
Thursday, March 26, 2009
More blogs and demo
http://www.c3dl.org/index.php/c3dl-dev/collision-detection/
This one talks about the improved speed of the collision detection and how that was achieved. The demo is at http://matrix.senecac.on.ca/~pplam3/OSD/canvas3dapi-dev4/testDemo.html
http://www.c3dl.org/index.php/c3dl-dev/collision-detection-default-testing/
This one talks about adding the feature of turning on/off the triangle-triangle test.
This one talks about the improved speed of the collision detection and how that was achieved. The demo is at http://matrix.senecac.on.ca/~pplam3/OSD/canvas3dapi-dev4/testDemo.html
http://www.c3dl.org/index.php/c3dl-dev/collision-detection-default-testing/
This one talks about adding the feature of turning on/off the triangle-triangle test.
Friday, March 13, 2009
More Blogs And Release 0.7
So we're finally reaching close to 1.0. It's crunch time and we really need to get our projects running smoothly. For me, that's a bit of a problem. The collision detection, in theory, is complete. It does what it needs to do, go through the objects in the 3D space, check for any collisions, and return that list back. That part work, it checks and it returns the result. But what the problem is, is the "smoothness" of the collision detection. Whenever there are more complicated objects with a lot more vertices in them, the collision detection takes a plummet to the bottom of processing and completely kills the whole canvas. For comparison, when testing between cubes, it's very smooth, because there are only 12 triangles on each cube. But as soon as we put spheres in, it just dies.
So what happens now is that the collision detection needs major improvement in efficiency. It needs to jack up the speed to run the test and make sure there's no unnecessary code running wild. To start off, I've cut down the number of triangle-triangle tests needed to be perform for the object by about half. Further details here
http://www.c3dl.org/index.php/c3dl-dev/collision-detection-signs-of-improvement/
Then next, I've cut down the number of ray-triangle tests called for each triangle-triangle test. Further details here
http://www.c3dl.org/index.php/c3dl-dev/collision-detection-07-further-improvements/
The plan for the next improvement is to break the 3D space into regions and perform collision detection in each region, instead of checking the 3D space as a whole. This will cut down the number of objects to compare for the collision detection and should increase the speed.
So what happens now is that the collision detection needs major improvement in efficiency. It needs to jack up the speed to run the test and make sure there's no unnecessary code running wild. To start off, I've cut down the number of triangle-triangle tests needed to be perform for the object by about half. Further details here
http://www.c3dl.org/index.php/c3dl-dev/collision-detection-signs-of-improvement/
Then next, I've cut down the number of ray-triangle tests called for each triangle-triangle test. Further details here
http://www.c3dl.org/index.php/c3dl-dev/collision-detection-07-further-improvements/
The plan for the next improvement is to break the 3D space into regions and perform collision detection in each region, instead of checking the 3D space as a whole. This will cut down the number of objects to compare for the collision detection and should increase the speed.
Friday, March 6, 2009
Collision Detection - The need for 'stepping'
A blog post has been made explaining the need for stepping in collision detection.
http://www.c3dl.org/index.php/c3dl-dev/collision-detection-updates-and-rationale/
http://www.c3dl.org/index.php/c3dl-dev/collision-detection-updates-and-rationale/
Friday, February 20, 2009
Collision Detection Release 0.6
The blog entry and details for release 0.6 has been posted on the C3DL page, and it can be read through here.
In this blog, I've talked about what was included in the release and explained how to use the collision detection class.
Again, here's the link to the demos created so far for collision detection: http://matrix.senecac.on.ca/~pplam3/
In this blog, I've talked about what was included in the release and explained how to use the collision detection class.
Again, here's the link to the demos created so far for collision detection: http://matrix.senecac.on.ca/~pplam3/
Friday, February 13, 2009
Collision Detection Updates
Again, I have posted my blog on C3DL site. Here's the link to it.
http://www.c3dl.org/index.php/c3dl-dev/collision-detection-updates-demo-pages/
In this blog, I have blogged about what the future plan is for the next release, as well as what's been done since the last release.
The most important part is that I've posted the links to the demo pages again. Here are the links to them.
Basic Demo Page 1
Basic Demo Page 2
Advance Demo Page
All of these and any other future demo pages can be found here: http://matrix.senecac.on.ca/~pplam3/
http://www.c3dl.org/index.php/c3dl-dev/collision-detection-updates-demo-pages/
In this blog, I have blogged about what the future plan is for the next release, as well as what's been done since the last release.
The most important part is that I've posted the links to the demo pages again. Here are the links to them.
Basic Demo Page 1
Basic Demo Page 2
Advance Demo Page
All of these and any other future demo pages can be found here: http://matrix.senecac.on.ca/~pplam3/
Friday, February 6, 2009
Collision Detection Release 0.5
Release 0.5 blog has been posted on the C3DL blog.
http://www.c3dl.org/index.php/c3dl-dev/collision-detection-release-05collision-detection-release-05/
http://www.c3dl.org/index.php/c3dl-dev/collision-detection-release-05collision-detection-release-05/
Wednesday, January 28, 2009
C3DL Project Recap/Updates
I will be posting my blogs on the C3DL site from now on. However, I will be posting the links to those post here so you can still get to those blogs.
Here are a couple blogs I have posted on the C3DL site.
1. This is a complete summary/walkthrough of the picking function done for C3DL.
http://www.c3dl.org/index.php/c3dl-dev/picking-function/
2. Here is the first update for the new project I started working on for this term. This project is adding the collision detection functionality to Canvas 3D.
http://www.c3dl.org/index.php/c3dl-dev/collision-detection-update/
3. Links to sample test pages for collision detection demo.
http://www.c3dl.org/index.php/c3dl-dev/collision-detection-test-pages/
Here are a couple blogs I have posted on the C3DL site.
1. This is a complete summary/walkthrough of the picking function done for C3DL.
http://www.c3dl.org/index.php/c3dl-dev/picking-function/
2. Here is the first update for the new project I started working on for this term. This project is adding the collision detection functionality to Canvas 3D.
http://www.c3dl.org/index.php/c3dl-dev/collision-detection-update/
3. Links to sample test pages for collision detection demo.
http://www.c3dl.org/index.php/c3dl-dev/collision-detection-test-pages/
Thursday, December 11, 2008
0.3 Goals Met - Release
Finally, after all the researching, the math reviews, the discussions, the coding, the testing, the back-tracking, it's ready - 0.3 Release.
Before talking about the final stretch to get the release done, lets see what's actually been done:
Modified the Model.js to include the following 2 functions
o getVertices(): returns the vertices of the object
o getBoundingBox(aabb): Returns an array of the min/max XYZ values for the bounding box after it's been scaled
Made Picking.js
o Disabled right-click menu on canvas
o Creates the mouse vector from the camera to the far clipping plane
- 2 main variables: Mouse Origin and Mouse Direction Vector
o Ray-Bounding Box Intersection Test
- Takes the min/max XYZ values of the bounding box, mouse origin and direction vector
- Returns true if intersect
- Need to transform the mouse origin and direction vector into the object's space before performing test
o Sorts the intersecting objects from closet to furthest from the camera
o Returns an array of object index in the scene
So, to continue from the previous blog, the correct mouse vector has finally been constructed and we've got ourselves a mouse origin and a mouse direction vector. The next part, which is the most important part was to construct a ray-box intersection test. I've found myself 3 different ray-box intersection algorithm and tried to implement them all, but they don't seem to work properly - only works in specific cases.
On Tuesday, went in to work with Andor. We've looked at the codes and did some more research. In the process, I've played around with the transformations and tried the tests again. Finally, it works. So what's been done now, is that I used one of the AABB tests, and to make it work properly, this is what needs to be done:
1) Get bounding box that's axis-aligned (not transformed)
2) Find the inverse of the object's transformation matrix
3) Apply the inverse transformation matrix to the mouse vector (brings the mouse vector into the object's space)
4) Pass in the values into the test
So now I simply run this test through all the objects in the scene and I've got myself a basic picking function. Afterward, I simply sorted the objects from closest to furthest. And to do that, I did some math and calculated the objects distance from the camera position and compared them.
At the end of the picking function, I had it returned an array of index of the objects in the scene.
During today's Skype meeting, I've updated everyone about the progress of the picking and told them where it's at. As it is, with the bounding box test working fine (even when objects are rotates, scaled, or moved the camera around), they are willing to add this into their next release. However, I will try to make this picking function better by implementing the ray-triangle intersection test and hopefully get this finish before their release, if not, they can add it to their next release.
As of now, my 0.3 Release is done, but I will continue to work on it to make it better. And when I get it done, I will post a more updated version of the picking function on the wiki page and have it be included in the next C3DL release.
Before talking about the final stretch to get the release done, lets see what's actually been done:
Modified the Model.js to include the following 2 functions
o getVertices(): returns the vertices of the object
o getBoundingBox(aabb): Returns an array of the min/max XYZ values for the bounding box after it's been scaled
Made Picking.js
o Disabled right-click menu on canvas
o Creates the mouse vector from the camera to the far clipping plane
- 2 main variables: Mouse Origin and Mouse Direction Vector
o Ray-Bounding Box Intersection Test
- Takes the min/max XYZ values of the bounding box, mouse origin and direction vector
- Returns true if intersect
- Need to transform the mouse origin and direction vector into the object's space before performing test
o Sorts the intersecting objects from closet to furthest from the camera
o Returns an array of object index in the scene
So, to continue from the previous blog, the correct mouse vector has finally been constructed and we've got ourselves a mouse origin and a mouse direction vector. The next part, which is the most important part was to construct a ray-box intersection test. I've found myself 3 different ray-box intersection algorithm and tried to implement them all, but they don't seem to work properly - only works in specific cases.
On Tuesday, went in to work with Andor. We've looked at the codes and did some more research. In the process, I've played around with the transformations and tried the tests again. Finally, it works. So what's been done now, is that I used one of the AABB tests, and to make it work properly, this is what needs to be done:
1) Get bounding box that's axis-aligned (not transformed)
2) Find the inverse of the object's transformation matrix
3) Apply the inverse transformation matrix to the mouse vector (brings the mouse vector into the object's space)
4) Pass in the values into the test
So now I simply run this test through all the objects in the scene and I've got myself a basic picking function. Afterward, I simply sorted the objects from closest to furthest. And to do that, I did some math and calculated the objects distance from the camera position and compared them.
At the end of the picking function, I had it returned an array of index of the objects in the scene.
During today's Skype meeting, I've updated everyone about the progress of the picking and told them where it's at. As it is, with the bounding box test working fine (even when objects are rotates, scaled, or moved the camera around), they are willing to add this into their next release. However, I will try to make this picking function better by implementing the ray-triangle intersection test and hopefully get this finish before their release, if not, they can add it to their next release.
As of now, my 0.3 Release is done, but I will continue to work on it to make it better. And when I get it done, I will post a more updated version of the picking function on the wiki page and have it be included in the next C3DL release.
Monday, December 8, 2008
0.3 Progress Update
Why-oh-why must I test my code so much? What happened? Oh nothing....I basically just had to redo whatever I've had for the mouse vector. However, I managed to make the process of calculating the mouse vector in fewer lines and faster time.
You can ignore all the previous calculations like finding the distance of the camera to the close/far clipping plane using trig, scaling the vector by the ratio, calculating inverse matrix, and everything else that's be done before.
Now, everything's simple. 1 simple trig, and a couple of multiplications and divisions, and we're done. So basically, I just scratched what I've done in the past....2 weeks and went back to what I had originally done in the beginning of the project.
1) Find the dimensions of the far clipping plane
2) Find the ratio between the far clipping plane and the canvas window size
3) Finding the x,y coordinates of the mouse on the canvas window relative to the far clipping plane. And use the distance between the camera and the far clipping plane as the z value.
To make the mouse vector be relative to where the camera is, we simply make the viewMatrix of the camera and multiply our mouse vector with it.
So now, wherever I rotate or move my camera to, the mouse vector will always be shooting from what we see from where the camera is to where we see as the far clipping plane in the back of the canvas.
How did this process get simplify to such an extend, I must thank Cathy and our 1 hr discussion we had and all the diagrams we kept drawing on the white board. That discussion really helped me get a clear image of how the 3D world is shown in that 2D canvas window. What was causing the main problem for having the mouse vector always being skewed towards the center, is because we ended up doing multiple matrix transformations. For what we see on the canvas, the 3D space that we see (perspective) has already been skewed (transformed) so it's in a more rectangular form than a triangle, and then flatten before being put on the screen. I've drawn a simple diagram to show what's been done from a bird's eye view(please excuse the poor drawing).
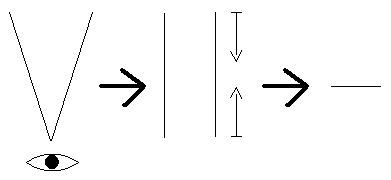
1) What we see in 3D space
2) Skewed (Perspective) and then Compressed
3) 2D (Canvas/Screen)
At least this is my understanding of it. And now that the mouse vector works properly, and FINAL (maybe minor improvements), I have to do the following:
1) Decide on an appropriate intersection test (have 2 right now)
2) Need to aligned mouse vector with testing object before testing intersection
3) Aligned object and mouse vector to axis to perform AABB test (Axis-Aligned Bounding Box)
I hope tomorrow's session with Andor will get these done. And afterward, I want to make the test do a more thorough intersection test rather than just the bounding box.
You can ignore all the previous calculations like finding the distance of the camera to the close/far clipping plane using trig, scaling the vector by the ratio, calculating inverse matrix, and everything else that's be done before.
Now, everything's simple. 1 simple trig, and a couple of multiplications and divisions, and we're done. So basically, I just scratched what I've done in the past....2 weeks and went back to what I had originally done in the beginning of the project.
1) Find the dimensions of the far clipping plane
var farWidth = 2 * ((C3DL_FAR_CLIPPING_PLANE) * Math.tan(degreesToRadians(0.5 * C3DL_FIELD_OF_VIEW)));
var farHeight = farWidth * (tempDiv.height/tempDiv.width);
2) Find the ratio between the far clipping plane and the canvas window size
var wRatio = farWidth / tempDiv.width;
var hRatio = farHeight / tempDiv.width;
3) Finding the x,y coordinates of the mouse on the canvas window relative to the far clipping plane. And use the distance between the camera and the far clipping plane as the z value.
var farX = (currX / tempDiv.width) * farWidth;
var farY = (currY / tempDiv.height) * farHeight;
var farZ = C3DL_FAR_CLIPPING_PLANE - camPos[2];
To make the mouse vector be relative to where the camera is, we simply make the viewMatrix of the camera and multiply our mouse vector with it.
viewMatrix = makePoseMatrix(scn.getCamera().getLeft(), scn.getCamera().getUp(), scn.getCamera().getDir(), scn.getCamera().getPosition());
var tempMouseVec = makeVector(farX, farY, farZ);
tempMouseVec = multiplyMatrixByVector(viewMatrix, tempMouseVec);
So now, wherever I rotate or move my camera to, the mouse vector will always be shooting from what we see from where the camera is to where we see as the far clipping plane in the back of the canvas.
How did this process get simplify to such an extend, I must thank Cathy and our 1 hr discussion we had and all the diagrams we kept drawing on the white board. That discussion really helped me get a clear image of how the 3D world is shown in that 2D canvas window. What was causing the main problem for having the mouse vector always being skewed towards the center, is because we ended up doing multiple matrix transformations. For what we see on the canvas, the 3D space that we see (perspective) has already been skewed (transformed) so it's in a more rectangular form than a triangle, and then flatten before being put on the screen. I've drawn a simple diagram to show what's been done from a bird's eye view(please excuse the poor drawing).

1) What we see in 3D space
2) Skewed (Perspective) and then Compressed
3) 2D (Canvas/Screen)
At least this is my understanding of it. And now that the mouse vector works properly, and FINAL (maybe minor improvements), I have to do the following:
1) Decide on an appropriate intersection test (have 2 right now)
2) Need to aligned mouse vector with testing object before testing intersection
3) Aligned object and mouse vector to axis to perform AABB test (Axis-Aligned Bounding Box)
I hope tomorrow's session with Andor will get these done. And afterward, I want to make the test do a more thorough intersection test rather than just the bounding box.
Wednesday, December 3, 2008
Solving other problems, help find hidden mistakes
After some more testing, I've realized that there were some major problems I need to fix before proceeding any further:
1) the center point (0, 0) on the canvas has some offset (about 3 pixels) in the browser
2) the (x, y) point of the mouse has not been converted from pixel to 3D coord
To quickly fix the first problem, I borrowed some code from a sample C3D demo:
As for the second problem, it took a little bit to figure out, but then I've came up with a temporary solution. I simply applied the same idea for getting the width of the far clipping plane, except here, I'm using the distance from position of the camera to the point it is looking at. And with that, I've calculated the ratio of the canvas to the actual space.
Now, this temporary solution only works when the object is at the look at position. So now I need to fix it so it'll work for objects at any position.
While coding this part, Andor and I also found a mistake that might have been causing a lot of problems from before. When we were calculating dz in the beginning, we did this:
Mathematically, it seems right, but then we realize that the Math.tan needs to take a radian and not a degree number, so we quickly fixed that by changing it to:
Luckily we saw this as we were making the pixel to 3D coord conversion, otherwise, we might have been stuck for a long time later on without realizing the problem has been there from the very beginning.
1) the center point (0, 0) on the canvas has some offset (about 3 pixels) in the browser
2) the (x, y) point of the mouse has not been converted from pixel to 3D coord
To quickly fix the first problem, I borrowed some code from a sample C3D demo:
function findPos(obj) {
 var curleft = curtop = 0;
 if (obj.offsetParent) {
  do {
   curleft += obj.offsetLeft;
   curtop += obj.offsetTop;
  } while (obj = obj.offsetParent);
  return [curleft,curtop];
 }
}

function getXandY( event )
{
 var tempDiv = document.getElementsByTagName('canvas')[0];
 var coords = findPos(tempDiv);
 // determine the correct X, Y
 var X = ( ( event.clientX - coords[0] ) + window.pageXOffset )  - (tempDiv.width / 2.0);
 var Y = (tempDiv.height / 2.0) - ( event.clientY - ( coords[1] - window.pageYOffset ) );

 return [X,Y];
}
As for the second problem, it took a little bit to figure out, but then I've came up with a temporary solution. I simply applied the same idea for getting the width of the far clipping plane, except here, I'm using the distance from position of the camera to the point it is looking at. And with that, I've calculated the ratio of the canvas to the actual space.
var camDist = Math.sqrt(Math.pow(camPos[0] - camLook[0], 2) + Math.pow(camPos[1] - camLook[1], 2) + Math.pow(camPos[2] - camLook[2], 2));
var midSpaceWidth = 2 * (camDist * Math.tan(degreesToRadians(theta));
var ratio = midSpaceWidth / tempDiv.width;
var tempX = ratio * currX;
var tempY = ratio * currY;
Now, this temporary solution only works when the object is at the look at position. So now I need to fix it so it'll work for objects at any position.
While coding this part, Andor and I also found a mistake that might have been causing a lot of problems from before. When we were calculating dz in the beginning, we did this:
var dz = dx / Math.tan(theta);
Mathematically, it seems right, but then we realize that the Math.tan needs to take a radian and not a degree number, so we quickly fixed that by changing it to:
var dz = dx / Math.tan(degreesToRadians(theta));
Luckily we saw this as we were making the pixel to 3D coord conversion, otherwise, we might have been stuck for a long time later on without realizing the problem has been there from the very beginning.
OSD Lab Reviews
Just like the previous labs, our last lab of the course did not turn out to be as difficult as I thought it might be. With the detailed instructions given, the lab was completed pretty smoothly. The main trouble I had was still the overall structure of where everything goes. Unfortunately, my previous and current project did not have much to do with plugin/extension, and hence the lack of knowledge and understanding of the tree structure was present. Other than that, everything was pretty much as easy as 1-2-3.
Afterwards, I've decided to look back at all the previous labs to make sure I didn't miss any of them. There was the:
• Ubiquity
• Mozilla Build Lab
• Patches Lab
• Thunderbird Bug posted on Bugzilla with Thunderbird Fix
• Mozilla Tab Patch Lab
• Mozilla Extension Lab
• XPCOM Component Lab
• Chrome Lab
As can be seen, the class has really gone a long way. Started with being introduced to add-ons, to building FireFox, to making and submitting patches. The only thing that I think could have been better was for the labs to be assigned earlier in the course instead of near the end. Because for people who were actually working with FireFox projects, I'm pretty sure they've been doing those things already. But for people like me, who worked on projects outside of FireFox, it truly was an interesting experience.
Afterwards, I've decided to look back at all the previous labs to make sure I didn't miss any of them. There was the:
• Ubiquity
• Mozilla Build Lab
• Patches Lab
• Thunderbird Bug posted on Bugzilla with Thunderbird Fix
• Mozilla Tab Patch Lab
• Mozilla Extension Lab
• XPCOM Component Lab
• Chrome Lab
As can be seen, the class has really gone a long way. Started with being introduced to add-ons, to building FireFox, to making and submitting patches. The only thing that I think could have been better was for the labs to be assigned earlier in the course instead of near the end. Because for people who were actually working with FireFox projects, I'm pretty sure they've been doing those things already. But for people like me, who worked on projects outside of FireFox, it truly was an interesting experience.
Monday, December 1, 2008
So Close Yet So Far
After spending the Friday afternoon with Andor trying to find ray-box intersection samples, we've finally narrowed it down to 3-4 tests to try.
- From www.blitzbasic.com
- Notes from University of Utah
- From 3D Programming Weekly
- And samples from "3D Game Engine Architecture" by David H. Eberly
Spending the weekend trying out the different sample tests, starting from what seemed the simpliest (blitzbasic), I've found the code from 3D Programming to work close to what I needed. This code is mainly used for testing AABB (Axis Aligned Bounding Box), and so, when the camera is set at positions that is not aligned with an axis, it doesn't work.
This test involves 3 separate functions:
Knowing that this test is for AABB, I've tested it to make sure that it at least works when being aligned at an axis at a time. Now, I need to figure out which of the suspected issue is causing the test failure:
- Applying transformation matrix to either box, ray, or camera
- The initial conversion of 2D to 3D coord of mouse is wrong
- Other unnoticeable bugs
But before I look for these errors, I think I will try out the other tests to see if they work any better. And maybe having another session with Andor will clear things up.
- From www.blitzbasic.com
- Notes from University of Utah
- From 3D Programming Weekly
- And samples from "3D Game Engine Architecture" by David H. Eberly
Spending the weekend trying out the different sample tests, starting from what seemed the simpliest (blitzbasic), I've found the code from 3D Programming to work close to what I needed. This code is mainly used for testing AABB (Axis Aligned Bounding Box), and so, when the camera is set at positions that is not aligned with an axis, it doesn't work.
This test involves 3 separate functions:
// fDst1 and fDst2 are the distance between P1/P2 and the bounding box
// Hit is use to store where the intersection point is
function GetIntersection(fDst1, fDst2, P1, P2, Hit) {
  if ((fDst1 * fDst2) >= 0) return 0;
  if ( fDst1 == fDst2 ) return 0;

  var tmp = new Array();

  tmp[0] = P1[0] + (P2[0]-P1[0]) * ( (-1.0 * fDst1) / (fDst2 - fDst1) );
  tmp[1] = P1[1] + (P2[1]-P1[1]) * ( (-1.0 * fDst1) / (fDst2 - fDst1) );
  tmp[2] = P1[2] + (P2[2]-P1[2]) * ( (-1.0 * fDst1) / (fDst2 - fDst1) );

  Hit = tmp;

  return Hit;
 }

// Checks to see if the Hit point is in the box and which axis it's aligned with
function InBox( Hit, B1, B2, Axis) {
  if (Hit != 0) {
   if ( Axis==1 && Hit[2] > B1[2] && Hit[2] < B2[2] && Hit[1] > B1[1] && Hit[1] < B2[1]) return 1;
   if ( Axis==2 && Hit[2] > B1[2] && Hit[2] < B2[2] && Hit[0] > B1[0] && Hit[0] < B2[0]) return 1;
   if ( Axis==3 && Hit[0] > B1[0] && Hit[0] < B2[0] && Hit[1] > B1[1] && Hit[1] < B2[1]) return 1;
  }
  return 0;
 }

// Check whether the line hit the box or not
function CheckLineBox(B1, B2, L1, L2, Hit) {
  if (L2[0] < B1[0] && L1[0] < B1[0]) return false;
  if (L2[0] > B2[0] && L1[0] > B2[0]) return false;
  if (L2[1] < B1[1] && L1[1] < B1[1]) return false;
  if (L2[1] > B2[1] && L1[1] > B2[1]) return false;
  if (L2[2] < B1[2] && L1[2] < B1[2]) return false;
  if (L2[2] > B2[2] && L1[2] > B2[2]) return false;
  if (L1[0] > B1[0] && L1[0] < B2[0] &&
   L1[1] > B1[1] && L1[1] < B2[1] &&
   L1[2] > B1[2] && L1[2] < B2[2])
   {Hit = L1;
   return true;}
  if ( (InBox( GetIntersection( L1[0]-B1[0], L2[0]-B1[0], L1, L2, Hit), B1, B2, 1 ))
    || (InBox( GetIntersection( L1[1]-B1[1], L2[1]-B1[1], L1, L2, Hit), B1, B2, 2 ))
    || (InBox( GetIntersection( L1[2]-B1[2], L2[2]-B1[2], L1, L2, Hit), B1, B2, 3 ))
    || (InBox( GetIntersection( L1[0]-B2[0], L2[0]-B2[0], L1, L2, Hit), B1, B2, 1 ))
    || (InBox( GetIntersection( L1[1]-B2[1], L2[1]-B2[1], L1, L2, Hit), B1, B2, 2 ))
    || (InBox( GetIntersection( L1[2]-B2[2], L2[2]-B2[2], L1, L2, Hit), B1, B2, 3 )))
    {
   return true;
    }
  return false;
 }
Knowing that this test is for AABB, I've tested it to make sure that it at least works when being aligned at an axis at a time. Now, I need to figure out which of the suspected issue is causing the test failure:
- Applying transformation matrix to either box, ray, or camera
- The initial conversion of 2D to 3D coord of mouse is wrong
- Other unnoticeable bugs
But before I look for these errors, I think I will try out the other tests to see if they work any better. And maybe having another session with Andor will clear things up.
Tuesday, November 25, 2008
0.3 Progress
Today, I had another working session with Andor on the Picking project. With the help of the newly made C3D demo page, we managed to make a big step forward.
So now, we've changed the way we were converting the mouse window coord into 3D vector back into calculating with trig. Before the change, we were
1) Converting windows coord to NDC
2) NDC to Viewspace
The
3) Viewspace to Model
modelMat x viewCoord
modelMat is a 4x4 matrix and viewCoord is a 4 value vector.
So what we did now instead, is back to using trig to calculate the distance from the camera position to the far clipping pan, and using that, we can calculate the dimension of it using ratio of the canvas dimension. And what we end up having in code now, is implementing Jeremy's idea of
1) Find distance to project plane
2) Make the vector of mouse picked point
3) Calculate the scale value to change the vector length to reach the far clipping plane and apply it to mouse vector
4) Orient the mouse vector to match our current camera view
Now, what we have here, is a vector of 3 value, which is the ending point of our mouse vector. In other words, this is the 3D coordinate of the point on our mouse vector intersecting the far clipping plane.
The next step now, is to try and make the actual line for this mouse vector, and do some initial intersection test for the line and the objects in the scene. After some time, Andor suggested that I try applying the object's trans matrix onto the mouse vector, and from that, we'd have both vector and object within the same space (model space). In that, we can then proceed to doing a bounding box check, and after that, I can do the actual object's intersection test.
What I need now, is
1) Mouse Vector Equation
2) Bounding Box/Object Face's Plane Equation
3) Equation for testing line/plane intersection
Onto testing and math review I go now...
So now, we've changed the way we were converting the mouse window coord into 3D vector back into calculating with trig. Before the change, we were
1) Converting windows coord to NDC
var Cx = ((2 * currX) / ( tempDiv.width)) - 1 ;
var Cy = (2 * currY) / tempDiv.height;
var Cz = (2 * currZ) - 1;
var Cw = 1;
2) NDC to Viewspace
var viewCoord = multiplyMatrixByVector(projMatInv, new Array(currX, currY, currZ));
viewCoord[2] = -5;
viewCoord[3] = 6;
The
multiplyMatrixByVector only calculates 3x3 matrix and a vector of 3 values. Therefore, the 3rd value will be calculated wrong and the 4th value will never be calculated. What we assumed here, is that the projMatInv never changes (since it's something we define), and with it, the 3rd and 4th value will always be calculated to be -5 and 6.3) Viewspace to Model
modelMat x viewCoord
modelMat is a 4x4 matrix and viewCoord is a 4 value vector.
So what we did now instead, is back to using trig to calculate the distance from the camera position to the far clipping pan, and using that, we can calculate the dimension of it using ratio of the canvas dimension. And what we end up having in code now, is implementing Jeremy's idea of
1) Find distance to project plane
var dx = 0.5 * tempDiv.width;  // tempDiv.width is canvas width
var theta = 0.5 * C3DL_FIELD_OF_VIEW;  // angel of view in degrees
var dz = dx / Math.tan(theta);  // distance
2) Make the vector of mouse picked point
var vPick = makeVector( currX, currY, dz );
3) Calculate the scale value to change the vector length to reach the far clipping plane and apply it to mouse vector
var scale = (C3DL_FAR_CLIPPING_PLANE - C3DL_NEAR_CLIPPING_PLANE) / dz;
vPick = multiplyVector(vPick, scale);
4) Orient the mouse vector to match our current camera view
viewMatrix = makePoseMatrix(scn.getCamera().getLeft(), scn.getCamera().getUp(), scn.getCamera().getDir(), scn.getCamera().getPosition());
vPick = multiplyMatrixByVector(viewMatrix, vPick);
Now, what we have here, is a vector of 3 value, which is the ending point of our mouse vector. In other words, this is the 3D coordinate of the point on our mouse vector intersecting the far clipping plane.
The next step now, is to try and make the actual line for this mouse vector, and do some initial intersection test for the line and the objects in the scene. After some time, Andor suggested that I try applying the object's trans matrix onto the mouse vector, and from that, we'd have both vector and object within the same space (model space). In that, we can then proceed to doing a bounding box check, and after that, I can do the actual object's intersection test.
What I need now, is
1) Mouse Vector Equation
2) Bounding Box/Object Face's Plane Equation
3) Equation for testing line/plane intersection
Onto testing and math review I go now...
0.3 Updates
Although the theory behind picking is known and understood, but the actual work for it seems much harder than I thought it'd be.
At first, I used trigonometry to calculate the projected vector from the point where the mouse was clicked on the canvas, and aimed it directly to the back of the scene. Before I read the documentations on the stages of transformation, I thought this had produced the correct vector. But now that understood the stages, what I have actually created was a vector in Perspective View. So, instead of using trig, I approached it differently and try converting the mouse coord through the different stages of transformation to get to 3D Space.
After following the steps to converting 3D coordinates from 2D:
1) Windows Coord -> NDC
2) NDC -> Viewspace
3) Viewspace -> Model
The results doesn't seem to look accurate. The math calculation done was double checked and they were correct, but it seems that the numbers used are performing incorrect transformations.
Since the existing benchmark was hard to test out the picking functionality, I have now created a custom Canvas 3D demo that's more suitable for testing it. Now, I can actually draw the testing scenario on paper, and actually have it tested out in the demo.
At first, I used trigonometry to calculate the projected vector from the point where the mouse was clicked on the canvas, and aimed it directly to the back of the scene. Before I read the documentations on the stages of transformation, I thought this had produced the correct vector. But now that understood the stages, what I have actually created was a vector in Perspective View. So, instead of using trig, I approached it differently and try converting the mouse coord through the different stages of transformation to get to 3D Space.
After following the steps to converting 3D coordinates from 2D:
1) Windows Coord -> NDC
2) NDC -> Viewspace
3) Viewspace -> Model
The results doesn't seem to look accurate. The math calculation done was double checked and they were correct, but it seems that the numbers used are performing incorrect transformations.
Since the existing benchmark was hard to test out the picking functionality, I have now created a custom Canvas 3D demo that's more suitable for testing it. Now, I can actually draw the testing scenario on paper, and actually have it tested out in the demo.
Tuesday, November 18, 2008
Picking - Harder Than It Seems
Picking isn't as easy as I thought it'd be. After further discussion and thinking about it, I've realize how big a project this. There is actually a lot more to it than just simple coordinate retrieving and coordinate conversions.
Now that I've done more reading and researching into this, there is a lot more work to do before I can complete this project. For example, from reading, I found out about the mathematics involved and the stages involved in 3D programming. The picture below shows the stages a 3D object needs to go through before it can appear as 2D object on our screen.

(Source from www.glprogramming.com)
With the vertices of a 3D object, it needs to go through the following transformation in order:
1) Viewing Transformation
2 & 3) Projection and Viewport (Any order)
4) Modeling Transformation
From understanding this, I would most likely need to go back to my 0.2 and fix some of the work. Because now that I understand these stages, I realize that what I have done, was just turned the windows coordinate of the mouse, and converted to perspective view (projection) but not 3D (modeling).
Now that I've understand theoretically what needs to be done, I need to go back, fix my mistakes, and put the rest to work.
Now that I've done more reading and researching into this, there is a lot more work to do before I can complete this project. For example, from reading, I found out about the mathematics involved and the stages involved in 3D programming. The picture below shows the stages a 3D object needs to go through before it can appear as 2D object on our screen.

(Source from www.glprogramming.com)
With the vertices of a 3D object, it needs to go through the following transformation in order:
1) Viewing Transformation
2 & 3) Projection and Viewport (Any order)
4) Modeling Transformation
From understanding this, I would most likely need to go back to my 0.2 and fix some of the work. Because now that I understand these stages, I realize that what I have done, was just turned the windows coordinate of the mouse, and converted to perspective view (projection) but not 3D (modeling).
Now that I've understand theoretically what needs to be done, I need to go back, fix my mistakes, and put the rest to work.
Subscribe to:
Posts (Atom)